Heading Block
Split your page into sections using the heading block. H1 through H6 headings are supported, along with a few styling options.
Overview
through ) can be used.
Let’s take a look at all the settings for the heading block.
Heading Block Settings
The following settings are available when using the heading block:
- Heading Level: H1, H2, H3, H4, H5 or H6
- Text Alignment: Left, Center, Right
- Bold
- Italic
- Strikethrough
- Links
- HTML Anchor
- Additional CSS Class
Now let’s take a look at how to customize a heading block.
Customize a Heading Block
Before you change a heading block’s settings, it’s important to note that the general styles of heading tags will be dictated by your WordPress theme.
Most themes use a larger font size, heavier font weight (aka: bold), and sometimes a different font family all together.
Before you make any changes, you might want to preview your heading styles to see how your theme displays them first.
Heading Block Editor Tools
You can use the following editing tools within your heading blocks. You’ll see some of the classics, like bold, italic & strikethrough, as well as a few new ones.

You can use the following editing tools within your heading blocks. You’ll see some of the classics, like bold, italic & strikethrough, as well as a few new ones.
Bold, Italics & Strikethrough
These options were also available in the classic WordPress editor, and they can be used the same way in the new WordPress editor.
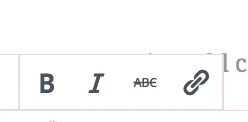
Simply click the B for bold, the I for italics, and the ABC for strikethrough.
Links
You can choose to link your entire heading, or only part of it.
- Highlight the text you want to link
- Click the link icon
- Type or paste in your URL
- Hit Enter
Heading Type - H2, H3, H4
You’ll see a few buttons that allow you to change the type of heading. In the quick editor toolbar directly above your heading, you’ll see options for H2, H3 and H4.
However, over in the right sidebar under the advanced settings, you can use any heading tag (H1 through H6).
NOTE: It is not recommended to use an H1 tag inside of your content. Typically, the H1 tag is reserved for your page title, which is already being displayed on your page dynamically by your theme.
Advanced Heading Settings
There are a few additional options in the advanced settings area.
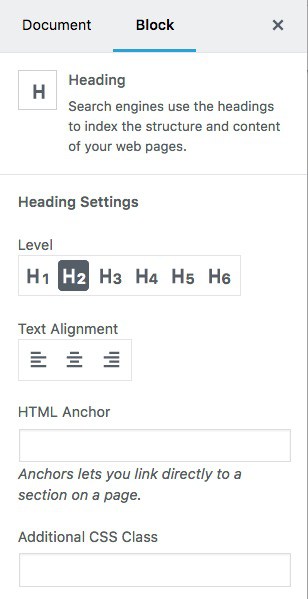
Text Alignment
You can align your heading to the left, right or center of the page.
HTML Anchor
HTML anchors allow you to link directly to this section on the page.
In more technical terms, using the HTML anchor field will add the id property to your heading element.
Here’s an example if you entered “section-name” into the HTML anchor field:
<h2 id="section-name">Section Title</h2>Then you would add a normal link somewhere else on the page, and in the link field, you would enter:
#section-name
That would jump you to the exact point on the page where that heading tag is located.
Recommendation: Do NOT use spaces in the HTML anchor field. Stick to single words, or separate multiple words with a hyphen (-). Do not use any other special characters.
Additional CSS Class
Like most block types, you can add a custom CSS class to any heading block.
If you’re looking for even more control over your headings, you can utilize this field to write styles of your own.
- Multiple CSS classes are permitted
- Separate each class name with a space
Switch a Heading to a Different Block
There are 3 different block types you can convert a heading into:
- Paragraph
- Quote
- Cover Image
The paragraph & quote conversions will happen just as you expect.
However, let me briefly explain converting your heading block into a Cover Image.
Convert Heading to Cover Image
The cover image block allows you to display an image behind your heading.
You can learn all about the cover image block here, but let me explain a few things that happen when you convert from a heading to a cover image.
- Your heading will be placed inside of a
<section>element - Your heading will automatically be converted to an H2 (even if you set it as an H3 or H4 before conversion)
- You can still adjust the heading’s text alignment, bold and italics, as well as add links
- You will lose the “HTML Anchor” advanced setting. However, you can still edit the cover image’s HTML code and add your own
idproperty that way.